The Application Options Property Sheet
General Considerations
Unlike MSO dialog boxes and property sheets that have been previously discussed, the Application Options property sheet is for setting and saving options that apply to all projects, not just the current one. As such, these options are saved in the Windows registry, not the current project.
The application options fit into four broad categories as follows.
- Options describing capabilities of your AVR and DSP device for use with filter reports and biquad export are in the Hardware category.
- Options regarding how data are imported and processed are in the Data category.
- Options that affect how the user interface works are in the User Interface category.
- Options that set the default allowable parameter adjustment range of all filters supported by MSO are in the Filter Parameter Defaults category.
These categories can be seen on the left side of the Application Options property sheet in the image below.
Because the application options are stored in the registry, if you want to use MSO on a different computer, you'll need to set the application options that are important to you on that computer as well.
The Hardware, Data and User Interface Property Pages
When you navigate through the different categories on the left side of the property sheet, different property pages will be shown. Currently, the Hardware, Data and User Interface categories have only one property page apiece associated with them. However, the Filter Parameter Defaults category has eighteen associated property pages, covering all supported MSO filter types.
All property pages will be described in detail below.
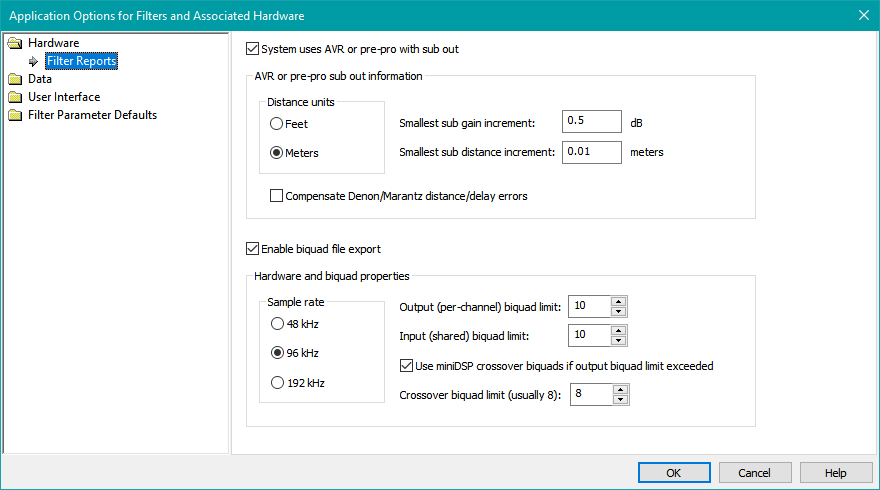
The Filter Reports Property Page
When you first launch the Application Options property sheet, the Filter Reports property page is shown by default underneath the Hardware category. It is pictured below.
This property page is part of the important topic of filter reports, which is essential to understand in order to get good results from MSO. Full documentation of the Filter Reports property page can be found in the Filter Reports topic. In that topic, this property page and how it fits into the broader context of creating MSO filter reports are discussed in detail.
The Data Options Property Page
The Data Options property page, found under the Data category, allows you to specify some aspects of how MSO processes and imports its data. This property page is shown below.
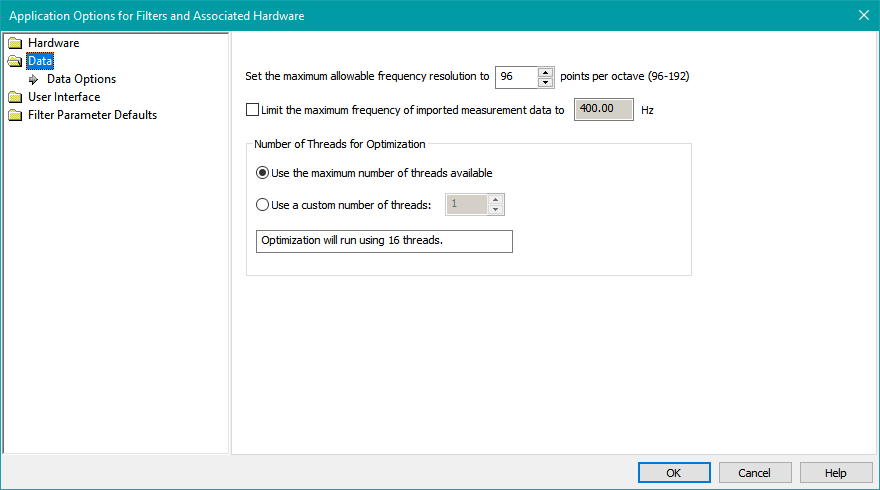
Setting the Maximum Points Per Octave for Display and Optimization
Some measurement software, such as REW, uses very high frequency resolution in exported response data. For instance, a common frequency resolution found in exported REW measurements is 0.366 Hz, determined by a combination of the sample rate of the sound card and the number of FFT points chosen. While this is great for looking at fine details of frequency response, using such a high frequency resolution in MSO would result in slow optimizations without any real benefit.
For this reason, MSO interpolates the frequency response data so that the frequency resolution is set to the value you specify here, which must be between 96 and 192 points per octave (PPO). The default is 96 PPO, which is fine for most cases. If you wish to examine, say, very deep and narrow response nulls, you can set the frequency resolution to its maximum allowed value of 192 PPO. That will give you more response detail. Before running another optimization, it's best to set it back to 96 PPO. Otherwise, the optimization will take twice as long as it would with the default 96 PPO setting.
Restricting the Frequency Range of Imported Data
If the measurement data for your system covers a much wider frequency range than needed for just subwoofers, you can speed up data import and minimize the size of your project on disk by checking the Limit the maximum frequency of imported measurement data checkbox. A good choice for this maximum frequency is 400 Hz. A similar thing can be done by defining a custom frequency range in the REW export dialog.
Setting the Number of Threads to Use for Optimization
MSO uses multiple threads in its optimization algorithm. The options described below allow you to choose the number of threads that will be used.
The Use the Maximum Number of Threads Available Option
The default behavior of an MSO optimization is to use as many threads as the number of concurrent threads supported by your CPU, up to a maximum allowed value of 32. The Windows Task Manager refers to the count of concurrent threads supported by your CPU as the number of CPU "logical processors". You can find out this number in Windows Task Manager by opening it up, choosing the Performance tab, and selecting CPU on the left. On the right side of this display, you'll see Logical processors listed. That is the number of threads that MSO will use when the Use the Maximum Number of Threads Available option shown in the image above is chosen.
If your CPU supports more than 32 concurrent threads, see the note below.
The Use a Custom Number of Threads Option
The aggressive use of threads by MSO during an optimization could be an annoyance if you were trying to do some other CPU-intensive task at the same time. To prevent this problem, you can specify a custom number of threads that MSO will use during an optimization. To do this, select the Use a custom number of threads radio button option shown in the image above. This will enable a spin control that allows you to choose the number of threads MSO will use. This can be any value between 1 and the maximum number of concurrent threads supported by your CPU.
This option will be disabled when using older single-core CPUs that do not support concurrency.
The Display of the Actual Number of Threads to be Used
The edit control below the Use a custom number of threads radio button shows the actual number of threads that MSO will use for optimization. The indication will change as the spin button for the count of threads is adjusted, and when you switch between the Use the maximum number of threads available and Use a custom number of threads options.
Using CPUs That Support More Than 32 Threads
One MSO user with an Intel processor supporting 36 concurrent threads reported some unusual behavior of an earlier version of MSO that has yet to be explained. That MSO version, which would have used 36 concurrent threads in this user's case, used less CPU resources than an earlier version that limited the maximum number of concurrent threads to 32. A subsequent MSO version set the maximum concurrent thread limit back to 32 for this reason.
The Use the maximum number of threads available MSO option is still limited to a maximum of 32 concurrent threads. If you wish to experiment with a larger number of threads for CPUs that support it, choose the Use a custom number of threads option. The maximum thread count allowed in the spin button control will be the number of concurrent threads supported by your CPU, up to a maximum of 50. In this way, you can experiment to see which option gives the most aggressive use of CPU resources. A good tool for checking CPU thread usage is the CPUID HWMonitor freeware.
The UI Options Property Page
When performing certain operations on your project, such as normalizing and rearranging gains and delays, MSO must sometimes make some "behind the scenes" adjustments to such things as the parameter value limits of the gains or delays that you're operating on. The UI Options property page, under the User Interface category, allows you to choose whether MSO should give you a warning message before it makes such changes.
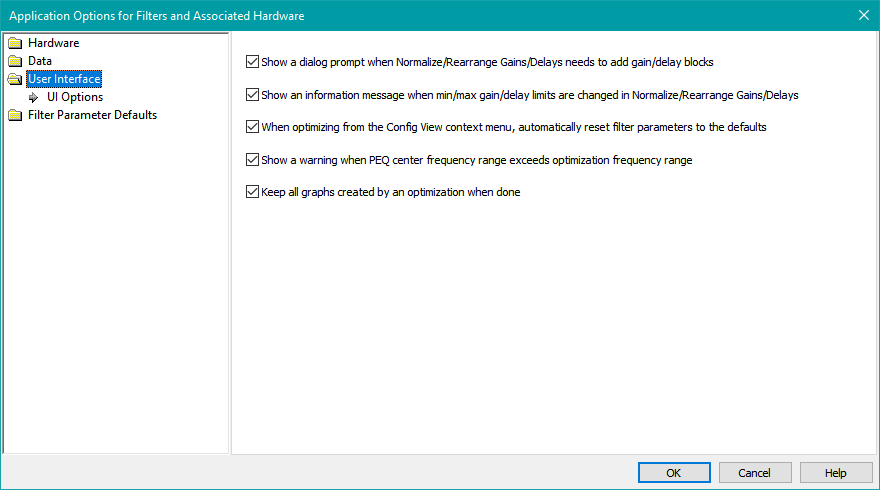
Providing a Warning Before Adding a Gain or Delay Block
Under certain situations when normalizing gains or delays, if the sub channels are not fully populated with gain or delay blocks, MSO may need to add one or more gain or delay blocks to accomplish the normalization. You can configure warnings about this behavior via the Show me a dialog prompt when Normalize/Rearrange Gains/Delays needs to add gain/delay blocks checkbox. When this option is checked, MSO will give you a warning and ask you to confirm the operation before it makes the changes.
Providing a Warning Before Changing Gain or Delay Parameter Value Limits
Sometimes when normalizing gains or delays, in order for the normalized condition to be equivalent to the condition before normalization, MSO might have to change gain or delay parameter value limits for the new gain or delay values to be within its allowable limits. This equivalency means that the gain or delay from the input to each output must be the same before and after the normalization. Warnings about this behavior can be configured using the Show me an information message when gain/delay limits are changed in Normalize/Rearrange Gains/Delays checkbox. When this option is checked, MSO will warn you before changing the gain or delay parameter value limits.
Automatically Resetting Filter Parameters When Optimizing a Configuration
You can control whether MSO automatically resets all filter parameters of the configuration to their default when you optimize a configuration in the Config View. This is done by right-clicking on the folder node having the name of the chosen configuration and choosing Optimize Configuration in the context menu. When the When optimizing from the Config View context menu, automatically reset filter parameters to the defaults option is checked, MSO will perform the automatic filter parameter reset each time a configuration is optimized using this method.
This parameter value reset only happens for the optimizations types As flat as possible at all listening positions and Minimize seat-to-seat variations (STSV) and flatten MLP response chosen on the Optimization Type property page of the Optimization Options property sheet. The other optimization types have their own parameter reset logic as part of the optimization itself.
Providing a Warning When PEQ Center Frequency Range is Large
When the range of allowable PEQ center frequencies set on the PEQ Limits property page exceeds the optimization frequency range specified on the Criteria property page of the Optimization Options property sheet, MSO will issue a warning when the optimization is run. To suppress this warning, uncheck the Show a warning when PEQ center frequency range exceeds optimization frequency range checkbox above.
Keep All Graphs Created by an Optimization When Done
When optimizing multiple configurations using the Multiple-Configuration Optimization Dialog, you specify a graph to be shown for each optimization. If you were to optimize a large number of configurations in one run, you could end up with so many graphs at the end that it would be difficult to navigate through them all. This option helps prevent such a situation. The behavior of MSO for the two different states of this checkbox is as follows.
- When the Keep all graphs created by an optimization when done checkbox is checked (the default), all the graphs created by the optimization as well as those graphs that were already shown before the optimization will be shown as tabbed views after the optimization is done.
- When the checkbox is unchecked, only those graphs that were already shown before the optimization will be shown after.
No graphs are ever deleted in this process regardless of the checkbox option. This option only affects whether a tabbed view of the graph is shown (as if you had chosen the Show Graph command from the Data View).