Tips For Preparing to Use MSO
MSO requires that you take a number of measurements, which are exported from REW, then imported into MSO so that it can perform its calculations. If you have, say, N subwoofers, and you measure them at M listening positions, you'll end up with N * M measurement text files that you'll need to export from REW. For each measurement text file, you'll need to know which sub and which listening position was measured. To keep track of all that, it helps to name your files carefully. Naming your measurements in REW and using the REW command to export all measurements will cause REW to automatically name the exported files based on their measurement names. Certain ways of choosing these measurement names make using the MSO Configuration Wizard easier. That will be discussed below.
In addition, you'll want to avoid mixups when bringing MSO filter data into your miniDSP device. Importing MSO filters into the wrong channel of the miniDSP will cause your MSO optimization results to be invalidated, and MSO's performance predictions will fail to match up with your measured data when you try to verify the final results.
Choosing File Names for the Exported REW Measurements
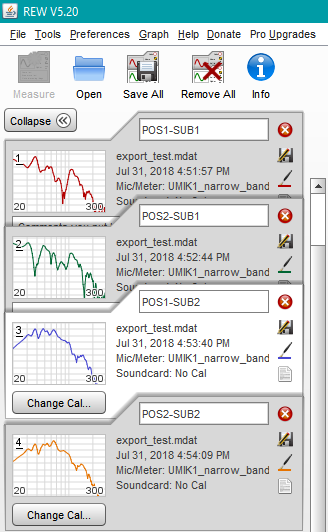
Below is a simplified example in REW of two subs measured at two listening positions. We'll export all these measurements as text in one operation. Although this seems trivial, notice the names POS1-SUB1, POS2-SUB1, POS1-SUB2 and POS2-SUB2 all have the listening position first, rather than the sub name. This ends up making the usage of MSO's Configuration Wizard a lot easier, as we'll see later when we associate measurements with the subwoofer measured and the listening position at which it was measured.
The REW Export Dialog
Now, we'll export the measurement text. In REW, choose, File, Export, Export all measurements as text. This will cause the following dialog box to be launched.
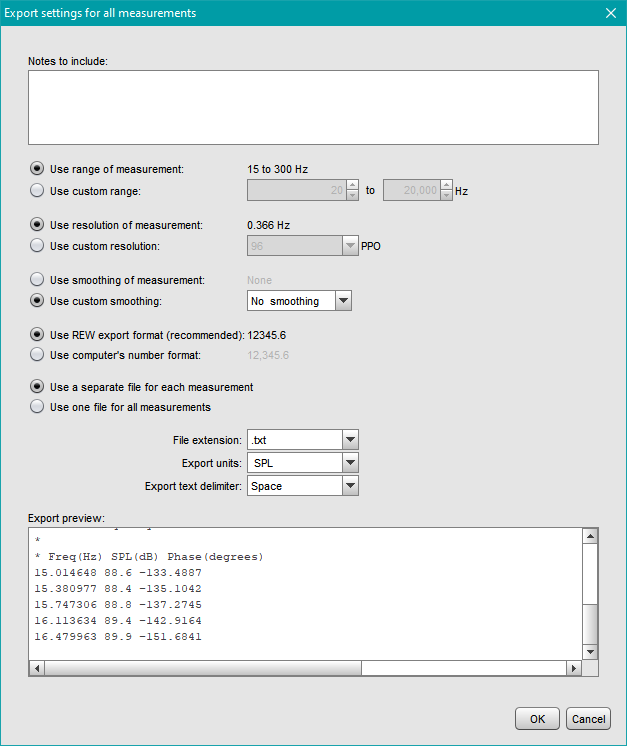
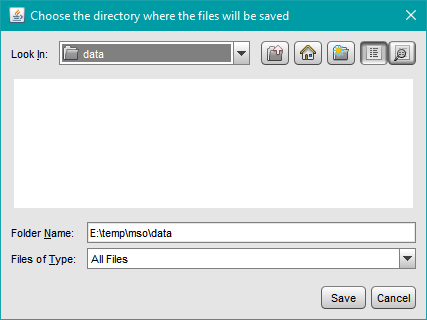
You may wish to limit the frequency range of the exported measurements. If they were taken over the full bandwidth (up to half your sound card's sampling frequency), it's helpful to set the upper frequency limit for export to 400 Hz. This will keep your MSO project from getting too large, and will speed up the measurement import. All measurements should be unsmoothed, so change the smoothing option to Use custom smoothing, and choose No smoothing in the combo box. Use REW export format and Use a separate file for each measurement should be selected. For the File extension option, choose .txt. Make sure that Export units is set to SPL and that Export text delimiter is set to Space or Tab. When you click OK, you'll be presented with the following dialog box for choosing the destination directory. Choose the desired directory and click Save.
Now let's look at the names of the exported files. You can see from the image below that the names are exactly what was entered into the edit controls in the REW measurement tabs above, but with ".txt" appended to them.
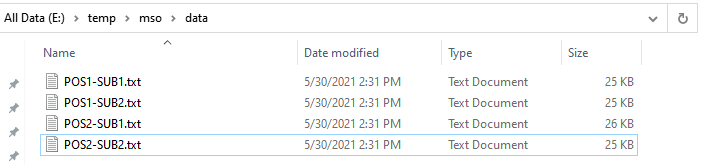
When these files are sorted alphabetically, they become grouped by listening position. This alphabetical grouping by listening position matches how the MSO Configuration Wizard works, making the use of the wizard much easier as we'll see later.
Using the Channel Labeling Feature of the miniDSP
After completing your MSO optimizations, you'll end up exporting several so-called biquad text files from MSO. These will usually be one per sub, plus a possible additional one for the input channel. You'll need to import each of these biquad text files into the correct channel of your miniDSP to specify the filters that go into that channel. For example, if you meant to import a biquad text file into the Sub 1 channel, and instead accidentally imported it into a different channel, MSO's optimization results would be invalidated.
To prevent this, use the miniDSP channel label feature to give each channel of the miniDSP a name that matches the name of the sub that it's hooked up to. This name should also match the sub name you chose above for the REW measurements. The MSO Configuration Wizard also asks you to name each sub, then behind the scenes it creates a channel in your MSO project for each sub, placing filters into it. MSO chooses the name of each channel to match the sub name you provide. So you will end up with a name for each sub in your REW measurements, within MSO, and for each channel of the miniDSP. These names should all match up.
Instructions for channel labeling are given in the 2x4 HD user manual (PDF). Keeping the channel names consistent in this way ensures that the MSO channel name of the exported biquad file will match the corresponding miniDSP channel name you specified using the labeling feature, making it easy to match up each biquad data file you export from MSO with the miniDSP channel into which it is imported.
After labeling each channel in the miniDSP, it's a good idea to verify your naming by applying a signal to the miniDSP while selectively muting all channels except one in turn, exercising each sub one at a time. For each condition, verify that the sub that's playing matches the name of the channel and sub that you have chosen.