Running an Optimization
Performing an optimization can be thought of as two separate logical steps.
- Optionally reset all filter parameters of a configuration to their default values before running the optimization (recommended).
- Run the optimization itself.
MSO versions prior to 1.1.12 required that these actions be performed separately. Versions 1.1.12 and later allow you to combine these steps to be performed at once.
In addition, there are multiple ways you can run an optimization. These fit into two broad categories:
- Optimize a single configuration.
- Optimize multiple configurations (version 1.1.12 and later).
Within each of these categories, you can launch the optimization in different ways. We'll cover the details of all the different ways you can run optimizations and reset filter parameters next.
Optimizing a Single Configuration
There are multiple ways you can optimize a configuration. These are listed below.
- Launch the optimization directly from a context menu in the Config View.
- Run the optimization from the Single-Configuration Optimization Dialog that's launched from a context menu in the Config View.
- Click the Optimize One Configuration toolbar button to launch the optimization from the Single-Configuration Optimization Dialog.
- Choose Config, Optimize One from the main menu to invoke the Single-Configuration Optimization Dialog.
Optimizing Directly From the Config View Context Menu
To use this method, activate the Config View and right-click on the topmost node of the configuration you wish to optimize. The context menu shown below will be displayed.
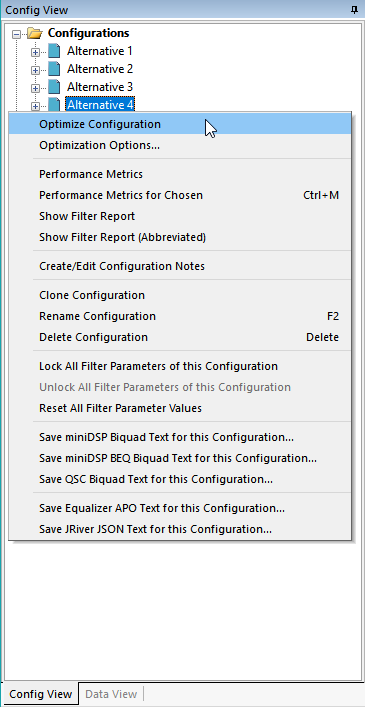
Choose Optimize Configuration as shown above. This will optimize the selected configuration directly without launching any dialog box.
Automatically Resetting Filter Parameters to Their Defaults
In versions 1.1.12 and later, you can tell MSO to automatically reset the filter parameters to their default values before optimizing via this context menu. To do so, choose Tools, Application Options, User Interface from the main menu. This will display the UI Options property page shown below.
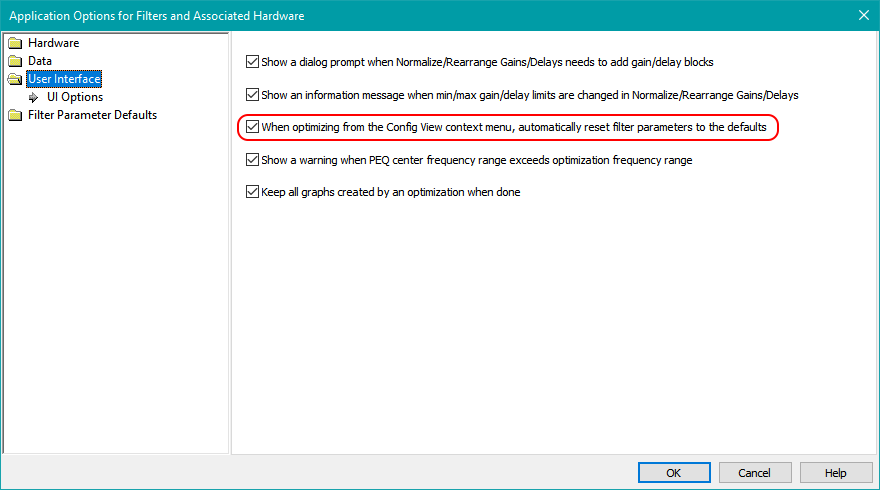
Check this option and choose OK. When this option is checked, MSO will always reset the configuration's filter parameters to their defaults before optimizing using the context menu shown above.
When using this simplified context menu for optimization, make sure there is a graph currently displayed that has traces belonging to the chosen configuration, and whose Plot live data when optimizing property is checked (the default). These traces will update in an animated fashion each time the optimizer reaches an improved solution.
Optimizing Using a Dialog Box Via the Config View Context Menu
To optimize using this method, activate the Config View and right-click on the topmost node of all configurations. The context menu shown below will be displayed.
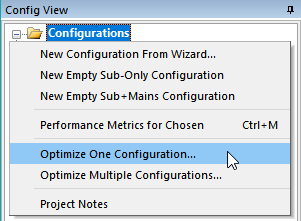
Choose the Optimize One Configuration item as shown above. This will launch the Single-Configuration Optimization Dialog described below.
Optimizing Using the Toolbar Button
To run an optimization using this technique, click the Optimize One Configuration button on the toolbar. See the illustration below.
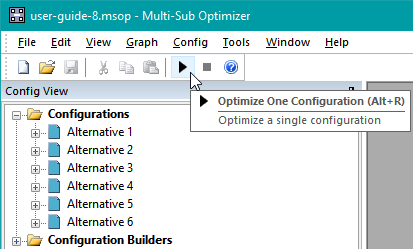
This will launch the Single-Configuration Optimization Dialog described below.
Optimizing Using the Main Menu
You can run an optimization from the main menu by choosing Config, Optimize One as shown in the figure below.
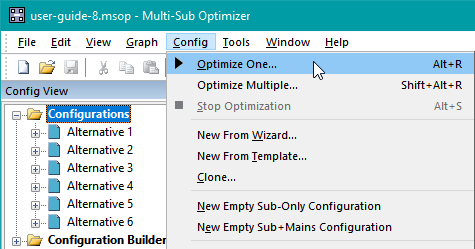
This will launch the Single-Configuration Optimization Dialog.
The Single-Configuration Optimization Dialog
The Single-Configuration Optimization Dialog is shown in the figure below.
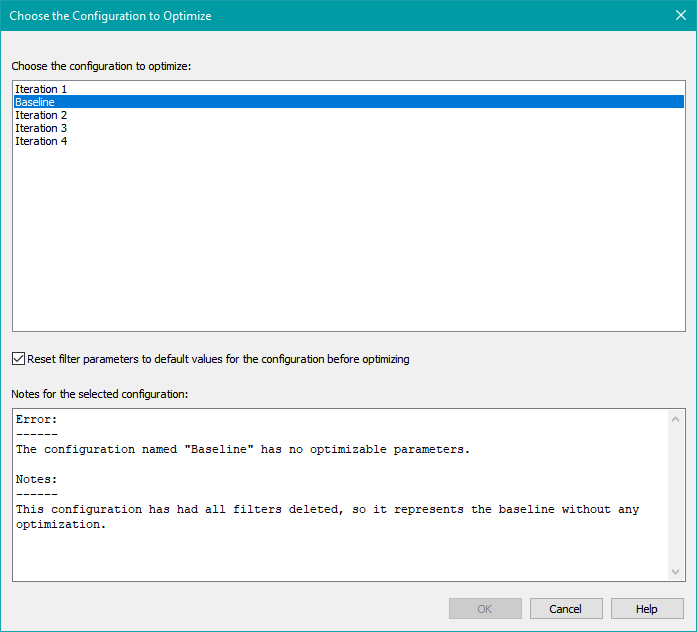
The controls of this dialog are described below.
The Configuration List Box
The Configuration List Box lists the names of all the configurations in the project. To choose a configuration for optimization, you can either select its name and click the OK button, or double-click its name.
The Reset Filter Parameters Checkbox
If this checkbox is checked prior to pressing OK or double-clicking on the configuration you wish to optimize, MSO will reset all filter parameters of the chosen configuration to their default values before optimizing.
The Display of Configuration Notes
This display works similarly to the configuration notes browsing feature, displaying the notes you created for the selected configuration if any. These notes may have other information added to them as described next.
Before the dialog is displayed, all configurations are checked for their ability to be optimized. If the checking process reports an error or warning, that message text is generated and displayed along with any configuration notes that may be present. Different combinations of configuration notes and error/warning message text are displayed as follows.
- If there are no notes for the configuration and no error or warning is present, no text will be shown.
- If notes for the configuration are present and no error or warning is present, the configuration notes will be shown.
- If there are no notes for the configuration and an error or warning message is present, the error or warning message text will be shown.
- If notes for the configuration are present and an error or warning message is also present, both the error or warning message and the configuration notes will be shown.
The latter case is demonstrated in the image above, showing both an error message and the configuration notes appropriately labeled. When a configuration that cannot be optimized is selected, the OK button of the dialog is disabled, and double-clicking on the configuration has no effect. This is also illustrated in the image above.
If a configuration has warning text (but not error text) associated with it, it can be chosen for optimization in this dialog.
Optimizing Multiple Configurations
There are two ways to optimize multiple configurations. These are listed below.
- Run the optimization from the Multiple-Configuration Optimization Dialog that's launched from a context menu in the Config View.
- Choose Config, Optimize Multiple from the main menu to invoke the Multiple-Configuration Optimization Dialog.
Optimizing Using a Dialog Box Via the Config View Context Menu
To optimize multiple configurations using this method, activate the Config View and right-click on the topmost node of all configurations. The context menu shown below will be displayed.
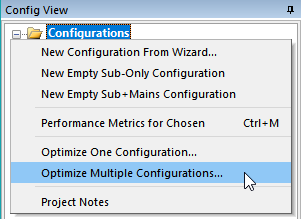
Choose the Optimize Multiple Configurations item as shown above. This will launch the Multiple-Configuration Optimization Dialog described below.
Optimizing Using the Main Menu
You can optimize multiple configurations from the main menu by choosing Config, Optimize Multiple as shown in the figure below.
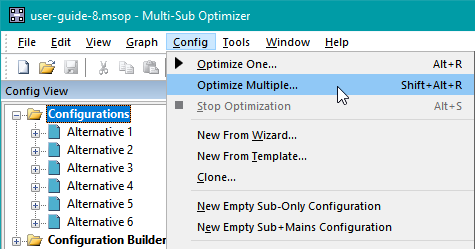
This will launch the Multiple-Configuration Optimization Dialog.
The Multiple-Configuration Optimization Dialog
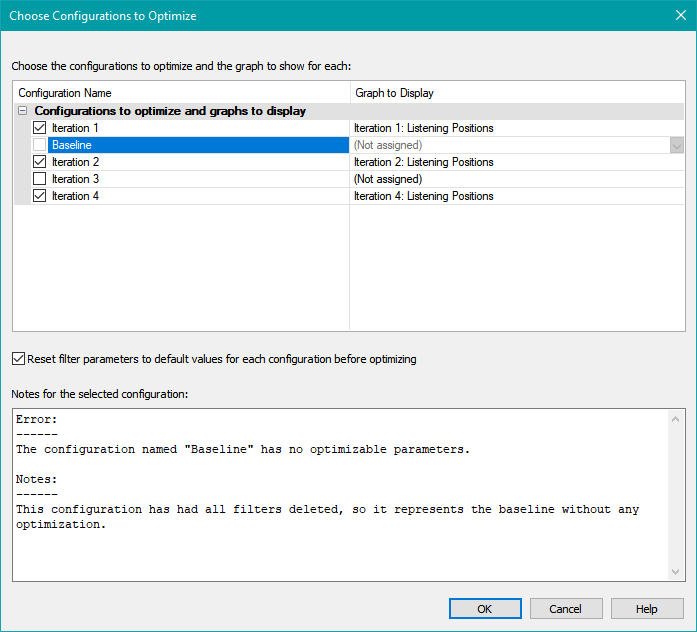
The Multiple-Configuration Optimization Dialog is shown in the figure below.
The controls of this dialog are described below.
The Configurations and Graphs Property Grid
Each row of this control has a checkbox you use to specify that the given configuration is to be optimized. The left column contains the name of the configuration. The right column, when its button on the right side is clicked, displays a drop-down list of all the graphs in the project that have traces associated with that configuration. If only one such graph exists for a given configuration, it will be selected for you automatically. Otherwise, you'll need to select which graph is to be displayed when the optimization of that configuration is performed.
The checkbox state can be toggled in three ways.
- Single-click on the checkbox itself.
- Double-click on the configuration name.
- With the appropriate row selected, press the space bar.
The Reset Filter Parameters Checkbox
If this checkbox is checked prior to pressing OK, MSO will reset all filter parameters of the chosen configurations to their default values before optimizing.
The Display of Configuration Notes
This display works similarly to the configuration notes browsing feature, displaying the notes you created for the selected configuration if any. These notes may have other information added to them as described next.
Before the dialog is displayed, all configurations are checked for their ability to be optimized. If a configuration cannot be optimized, due to having no filters or if all parameters of all filters are locked, error message text is generated and displayed along with any configuration notes that may be present. Different combinations of configuration notes and error message text are displayed as follows.
- If there are no notes for the configuration and no error or warning is present, no text will be shown.
- If notes for the configuration are present and no error or warning is present, the configuration notes will be shown.
- If there are no notes for the configuration and an error or warning message is present, the error or warning message text will be shown.
- If notes for the configuration are present and an error or warning message is also present, both the error or warning message and the configuration notes will be shown.
The latter case is demonstrated in the image above, showing both an error message and the configuration notes appropriately labeled.
If a configuration has either an error or warning displayed (such as the "Baseline" configuration in the figure above), it cannot be optimized from this dialog. In such cases, the row containing the configuration information will be grayed out. Its checkbox will be unchecked and disabled, and its drop-down list disabled. The row can still be selected as shown above.
Disabling the Frequency Range Warning
If the configuration has a warning message regarding the frequency range of optimization vs. the allowed PEQ center frequency range, you can include it in a multiple-configuration optimization by first disabling the warning on the UI Options page of the Application Options property sheet, then returning to this dialog to select the configuration.
General Considerations
The configuration selection state, the graph to be diplayed when optimizing each configuration, and the choice of whether to reset filter parameters are all saved from one invocation of this dialog to another, and also saved with the project.
Beacause of the automated nature of optimizing multiple configurations, the results are automatically saved to each configuration. There is no dialog box shown at the end of an optimization allowing you to reject the results as there is when optimizing a single configuration.
A Warning
Optimizing multiple configurations using this feature is for experienced users only. One problem encountered by some new users is that after performing an optimization using MSO, entering its calculated filter information into their DSP device, then measuring all subs together, they find that MSO's predictions don't match the final measured results. This problem is the subject of the FAQ, and can be time-consuming to track down. If you encounter such a problem, optimizing multiple configurations using this feature will not fix it. Instead, it will multiply the problem, causing even more trouble for you and anyone who tries to help find a solution. Before using the multiple-configuration optimization, you'll need to do the following.
- Perform single-configuration optimizations until you get satisfactory results.
- Enter MSO's calculated filter data, gains and delays into your DSP.
- Perform a measurement at the MLP with the calculated DSP settings using all subs operating together.
- Compare the final measured results with MSO's predictions. You can import these measured results into the same graph used for MSO's predictions by performing a File, Import Plot-Only Measurements command, then adding the imported measurements to a graph containing MSO's predictions.
- If the final measurements don't agree with MSO's predictions, try the suggestions in the FAQ. Fixing the problem sometimes involves redoing the measurements, as the most common problem is neglecting to use a timing reference, or having some problem with the timing reference.
- Repeat the process until you've figured out what went wrong and are able to get the final measured results to agree with MSO's predictions for a single configuration.
Only after successfully performing these steps should you try optimizing multiple configurations using this technique.
Resetting Configuration Filter Parameters
In addition to the methods described above for automatically resetting the filter parameters of configurations to their defaults before optimizing, you can also reset filter parameters manually. There are two ways to do this.
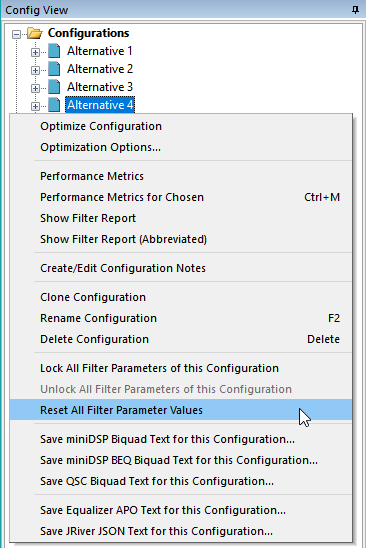
- In the Config View, right-click on the configuration whose parameters you wish to reset, and choose Reset All Filter Parameter Values.
- From the main menu, choose Config, Reset All Filter Parameter Values. This will launch the Filter Reset Dialog.
More discussion about filter parameter resetting can be found in the Tips and Tricks section.
Resetting Filter Parameters Using the Context Menu
Using the context menu to reset filter parameters is illustrated in the figure below.
Using the Filter Reset Dialog to reset filter parameters is illustrated in the section below.
Using The Filter Reset Dialog
The Filter Reset Dialog is described below.
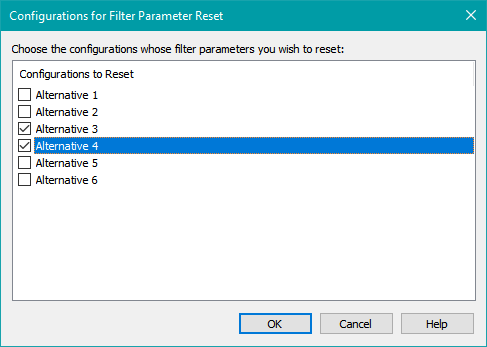
The Configuration Selection List View
Select the configurations whose filter parameters you wish to reset using the checkboxes in this list view. Since this operation causes significant changes to the selected configurations, you'll be presented with a message box asking you to confirm your selection upon pressing the OK button.
Using With Multiple-Configuration Optimization
There might be a rare situation in which you want to optimize multiple configurations, but reset the filter parameters of only some of them. In the Multiple-Configuration Optimization Dialog, the choice of resetting filter parameters is an "all or nothing" proposition with regard to the chosen configurations. In such a situation, you can use the Filter Reset Dialog to reset the filter parameters of just the configurations you want, then in the Multiple-Configuration Optimization Dialog, uncheck the Reset filter parameters to default values for each configuration before optimizing checkbox before pressing OK to start the optimization.
After an Optimization is Started
After starting an optimization using one of the techniques described above, the Output Window will show a running status of the current optimization, including the computed optimization error in the Optimization Status tab. The title bar will display the name of the configuration, along with whether the optimization is running or stopped. An example of the Output Window display is shown below.

If you have a graph open with traces having the Plot live data when optimizing property checked, these traces will update in an animated fashion each time the optimizer reaches an improved solution. The graph of a typical configuration before optimization is shown below.

While a single optimization is running, you can either wait for the optimization to complete, or press the Stop Optimization button on the toolbar. In either case, MSO will ask you whether you want to keep the results the optimizer computed or revert to the original state. Click the appropriate button on the dialog box to proceed.
If you press the Stop Optimization button on the toolbar while a multiple-configuration optimization is running, the currently running optimization will be stopped, and MSO will ask you whether you want to keep its results or revert it to the original state. The results of all optimizations that were previously run will still be retained, and all pending scheduled optimizations will be canceled.
When an optimization is finished, the relevant plot will display the final optimized result. Assuming the configuration was set up correctly, the plot of the configuration after optimization will show better response flatness and less seat-to-seat response variation than before optimization. An example of a typical configuration after optimization is shown below.

Although this is a big improvement over the condition before the optimization was run, it is just one of many possibilities that could be explored. You might want to try a different number of PEQs per sub, or see what could be done with a minimalist configuration, or some other alternative. To do this, you'll want to make a copy of the configuration you just created, modify the copy in some way, then run an optimization on the copy and compare the results with the original configuration. In the next section, we'll look at the configuration cloning feature that allows you to easily create a new configuration based on an existing one.